Chocolate-covered Strawberry Cake Pops
Looking for a simple yet sweet treat? These chocolate-covered strawberry cake pops are the answers! These are made with few ingredients and are easy to make. Taste the cake covered in melted chocolate. Perfect for Valentine’s day or dessert all year round.

What are Chocolate-covered Strawberry Cake Pops?
These chocolate-covered strawberry cake pops are one of the best desserts to serve this Valentine season. Its heart-shaped figure coincides with the celebration being done. However, because of its perfect taste, you can even serve it the whole year round on occasions you celebrate.
Moreover, the procedure to create these sweet treats are basic and simple. This includes the ingredients as well. With this being said, you can really involve your children in the process. They will surely enjoy it.
Subsequently, the taste is truly delicious. You can taste the fluffy cake dough covered in melted chocolate. Also, the looks of it are really enticing that it will attract you to eat some more.

What Equipment Should You Prepare?
Well, there are a few tools that you should prepare prior to making the cake pops and they are the following:
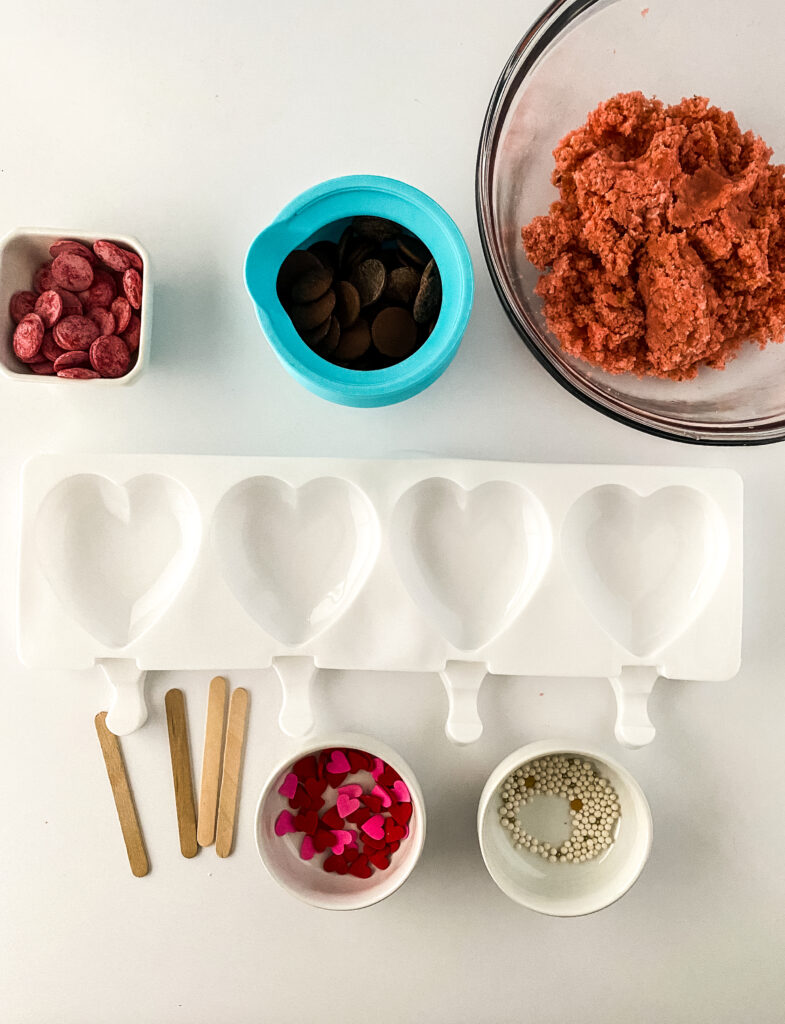
- Heart shape mold, if you want your cake pops to have a heart-shaped figure, you can prepare this mold.
- Ice Cream Molds, on a side note, I recommend you to have this silicone ice cream mold.
- Parchment paper, to avoid the cake pops covered in chocolate to stick on baking pans while cooling them.
- Popsicle sticks will be the handles of the cake pops.
- Silicon Melting pots for chocolate, are optional to have.
What are the Ingredients to Set?
Basically, this recipe includes four ingredients only, and these are:
- Strawberry Cake Pop dough. Bake this strawberry cake and turn it into cake dough for the pops.
- Ghirardelli Milk chocolate melting wafers. Cake pops are coated with these chocolate melts.
- Red candy melts. Used for the zigzag effects of the cake pops.
- Sprinkles.
How to Make the Chocolate-covered Strawberry Cake Pops?
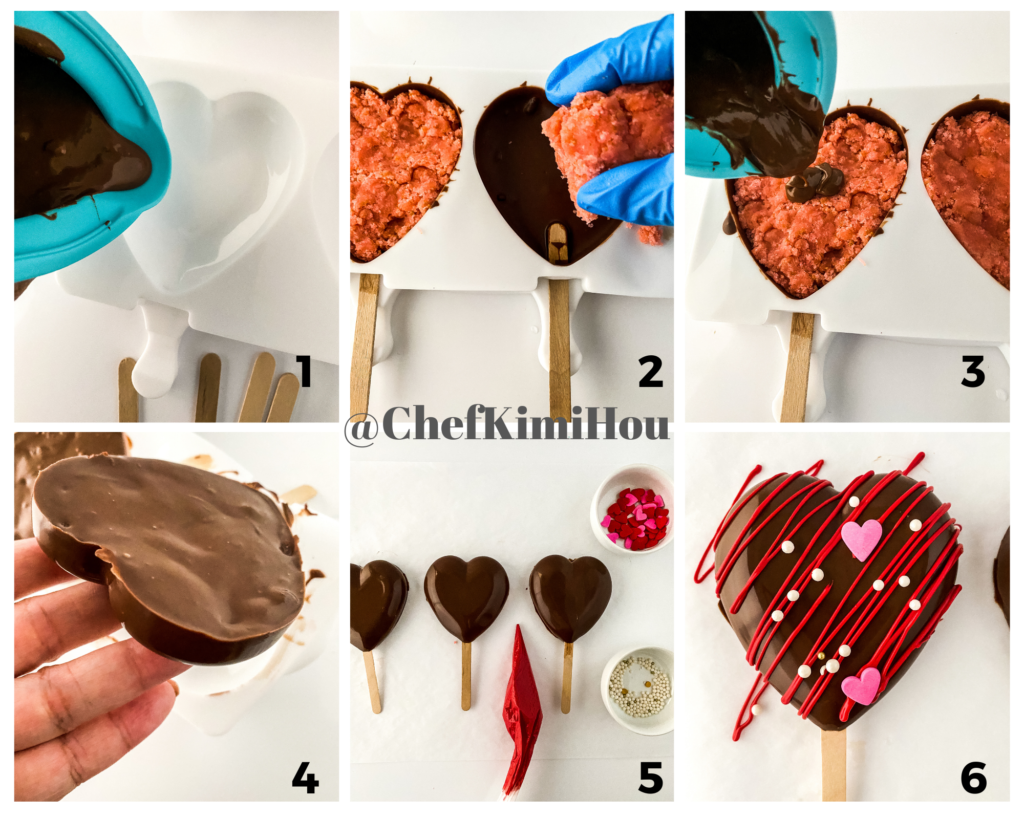
The preparation of these cake pops is basic and easy. Once you are done baking a strawberry cake and turning it into cake pop dough, melt your chocolate wafers at 30-second intervals until fully melted.
Once they are melted, pour the chocolate into heart-shaped cavities making sure to get it completely up the sides. Place them in the freezer for 10 to 15 minutes until set. After the time, remove from the freezer and carefully add cake pop dough to the molds, do not press too hard, or the chocolate may crack. Subsequently, cover the back with chocolate and place back in the freezer for 7 to 9 minutes.
Carefully peel molds, remove the cake pops, and place them on parchment paper. Set them aside and melt the red candy melts in a piping bag in 30-sec increments.
Finally, once melted let rest for 1 to 2 minutes then cut a small hole in the tip of the piping bag and create zigzag, circles, or lined patterns. Immediately add sprinkles. Moreover, let it rest for 10 to 15 minutes before serving.
Chef’s Note:
Using silicon pots helps control waste and spillage. You can leave the chocolate inside until it's cool then peel it out and save it to use again if bagging these are treats let rest 30 before placing them in a bag to avoid smudging.


Chocolate-covered Strawberry Cake Pops
Equipment
- Heart shape mold
- Ice Cream Molds,
- Parchment Paper
- Popsicle sticks
- Silicon Melting pots for chocolate, optional
Ingredients
- Strawberry Cake Pop dough
- Ghirardelli Milk chocolate melting wafers
- Red candy melts
- Sprinkles
Instructions
- After baking strawberry cake and turning it into cake pop dough, melt your chocolate wafers at 30 second intervals until fully melted.
- Pour chocolate into heart shaped cavities making sure to get it completely up the sides.
- Place in freezer for 10-15 min until set.
- Remove from freezer and carefully add cake pop dough to the molds, do not press too hard or the chocolate may crack.
- Cover the back with chocolate.
- Place back in freezer for 7-9 mins
- Carefully peel molds and remove the cake pops.
- Place on parchment paper.
- Melt the red candy melts in a piping bag on 30 sec increments.
- Once melted let rest for 1-2 mins then cut a small hole in the tip of the piping bag and create zigzag, circles or lined patterns.
- Immediately add sprinkles.
- Let rest for 10-15 mins before serving.